 Painting a miniature: Undead
 Painting a miniature: Undead
Right out of the package, this figure had no flash. It is highly detailed with deep incised lines showing the separation between the bones. It will be easy and fast to paint, with the whole figure taking about ten to fifteen minutes to complete after the primer dries. This time will be longer if it is your first skeleton, and it will average shorter if an assembly line is formed for several of the same miniature. painting an entire unit at once is a good way to work with skeletons.
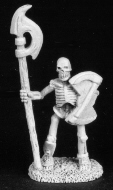
 Undead (REAPER miniatures #02014 by D. Pugh) photo used by permission |
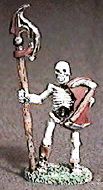
 Undead (REAPER miniatures #02014 by D. Pugh) Photo by Jeremy Fowler-Lindemulder |
The first part of the process, after checking for flash, is priming. Undead are supposed to look creepy, dark, and perpetually in deep shadow, so black will be our primer of choice. Some people will use the rationale that bones should be white, so it saves a step to prime in white. This will produce light bones, devoid of detail. Prime it black and follow along.
The first, and most complicated painting will be done on the bones. There will be more detailing on the bones than any other part of this figure. Bones are not just plain white. There are a wide range of murky, musty shadows that we will be building up as we paint. Start with the color that I call bone muck. Tan might work, but I always mix my own to get that special mucky feeling. Start with white, and add an equal amount of yellow. This will make it a strong cream or antique white color. To this color add just a little bit of purple, the complement of yellow, until it cancels out the yellow just enough to give it a mucky tan look. This will be our first layer of paint on the bones.
At this point, when painting the bones, keep two things in mind. First, the bones should not be completely covered with paint. The black primer will be the darkest shadows, so leave thin primer lines showing between each of the bones, especially the ribs, teeth, fingers, toes, teeth, nostrils, and eye sockets. Second, this layer needs to be applied very neatly. The bone muck colored paint should be dry brushed thickly and neatly over the entire skeleton.
The next layer is again the bones. This time we will use the cream color we had before we mixed the purple into the bone muck. Dry brush this lightly over the already painted bones. This will create lighter areas on the bones, and add to the mottled look that makes for a truly horrific undead creature.
The third layer is again the bones. Use a little bit of pure white to very lightly dry brush over the bones one final time. This will add the final highlights and complete the painting of the bones. Look at your figure. Now, that is a skeleton.
The rest of the figure is very simple. use straight brown to dry brush the wooden halberd pole, the scythe handle on the shield, the leather strap on the back of the shield, and the leather parts of the foot and shin guards. By continuing to dry brush the colors, the black primer remains as the dark shadows in the wood grain and leather corners.
For the metal on the halberd blade, the scythe blades on the shield, and the buckles on the feet, use silver. Mix it with water and use the silver as a light wash on these articles. The black primer showing through the sparkley wash will make these metal pieces look old and dark.
For accent coloration, pick any appropriate color. I am partial to purple on skeletons because there is so much yellow in the bones, but I want to keep it dark on this figure. Dark purple does not always show up very well, so we will mix red and black paint in equal parts. Technically, this color should be maroon. It is sort of a violet brown that will look good on this figure by tying in the brown of the leather and wood while complementing the yellow in the bones. This color is used to paint the design on the halberd's blade and the flat parts of the shield. When painting the shield, leave a thin black area around the double bladed scythe.
The figure should now be finished. Now it is time to pay attention to the base. If you are using this figure in an army, you should glue it to a 20mm or 25mm base. If you are just using it for dungeon trappings, you may wish to do some sort of dark dry brushing or stones like we did on Eli (REAPER miniatures #02022 by S.Garrity).
I left it open, and made the base look like musty grass. To do this, dry brush the base with bone muck. then add some dark green to the bone muck and re-dry brush. Finally, dry brush with a straight dark green. Add little colored spots for flowers if you feel like it.
The following colors were used on this miniature:
This figure should seem dark and murky with accentuated highlights. It does have highly detailed features and some distinctive accents that may change from figure to figure. Some people even like to place little red dots, or lights, inside the eye sockets to represent some sort of mystic animation. I usually do not do this, but it is really up to whoever paints it. Others may wish to add rusty tones to the metal or bloody gore to the weapon blade. Again, these accouterments are personal choices.
Do not forget to give the entire figure a clear sealant coat before touching it on any regular basis.